Checking In & Out Equipment
The Check Out feature helps organizations oversee equipment and tool custody transactions & usage history in Calibration Control (our calibration management software). Issue items out and, at the same time, reference a work order or job number, log the name of a person, modify the equipment status and more, all while automatically creating an audit trail and tracking its usage count. Watch how-to videos available at the bottom of this page to utilize the Check Out activity feature.
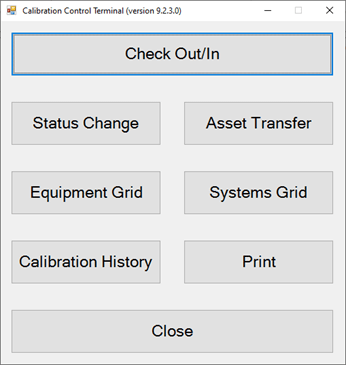
Accessing Check Out
Check Out from the Ribbon Menu: In the top ribbon menu, select the Tools tab and select 'Check Out' from the Update Activities section.

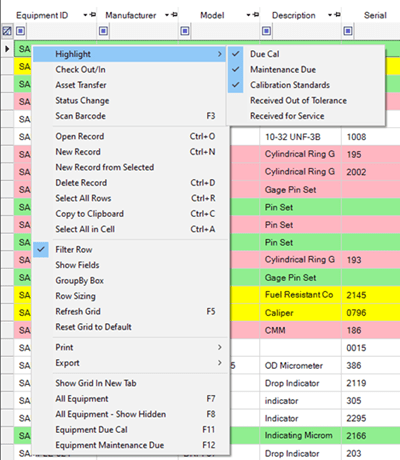
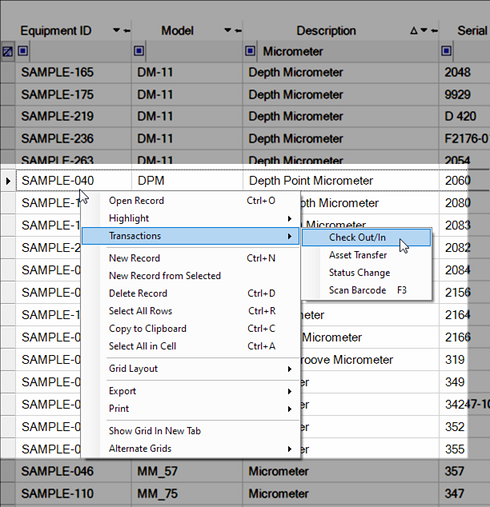
Check Out from the Context Menu: In the Equipment grid, right-click on a record or grid row for the context menu, hover over Transactions and select 'Check Out'.
Different Dialog Appearances
Featuring Three Looks: While there are two places to access the Check Out dialog to issue a transaction, there are three appearances in which the Check Out dialog may display! Each of these 3 options serve a purpose, depending on the fields or number of records you wish to include in the check-out process.
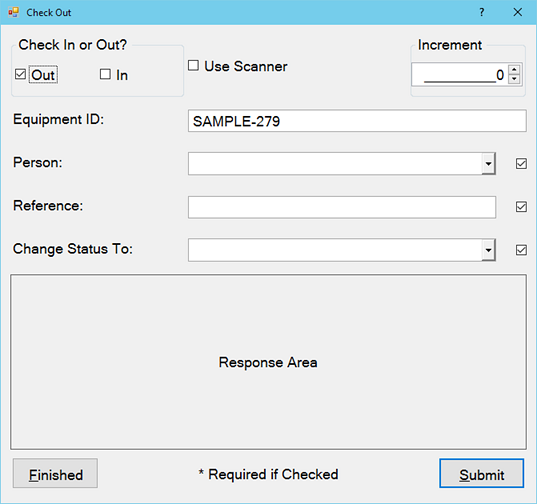
- Context Menu, Traditional Dialog:
Selecting the Check Out feature using the context menu in the Equipment grid will appear as the below dialog image(s). This method will
automatically populate the Equipment ID field in the Check Out dialog. Input data changes of the available fields: the Person for the check-out, adding a short note or Reference Number, and changing the equipment status code. This traditional dialog is the classic look of the Check Out feature and most of the following how-to instructions described below in this help page uses this appearance in reference.
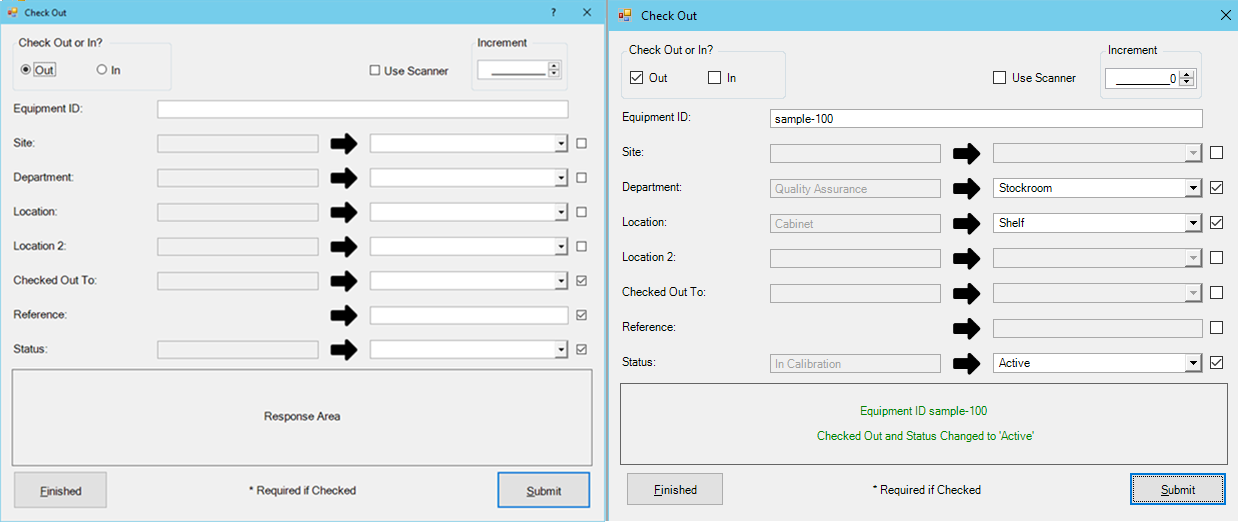
- Ribbon Menu, Additional Fields:
Selecting the Check Out dialog from the ribbon menu's Tools tab will appear as the below image(s). This method does not automatically populate any fields, awaiting for user input even of the Equipment ID. This dialog offers additional fields from the traditional dialog shown above, including ability to check out and modify the Site, Department, & Location 2 fields of the Equipment record.
- Context Menu, Multi-Transactional Dialog:
First, you must activate the ability for checking out more than one equipment at a time by selecting the multiple transactions checkbox from the Options dialog > Advanced tab.
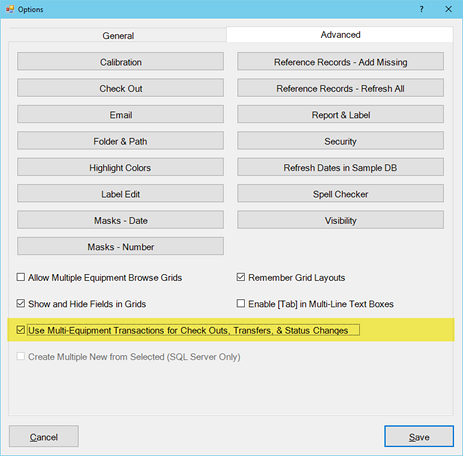 When this option is active, hold your cursor over multiple records from the Equipment grid and select 'Check Out' from the context menu. Then the Check Out dialog will appear as the below image with three fields available to modify -- the Person, a reference field, and the ability to change the equipment status code.
More about the multi-transactional dialog is available at the bottom of this help page.
When this option is active, hold your cursor over multiple records from the Equipment grid and select 'Check Out' from the context menu. Then the Check Out dialog will appear as the below image with three fields available to modify -- the Person, a reference field, and the ability to change the equipment status code.
More about the multi-transactional dialog is available at the bottom of this help page.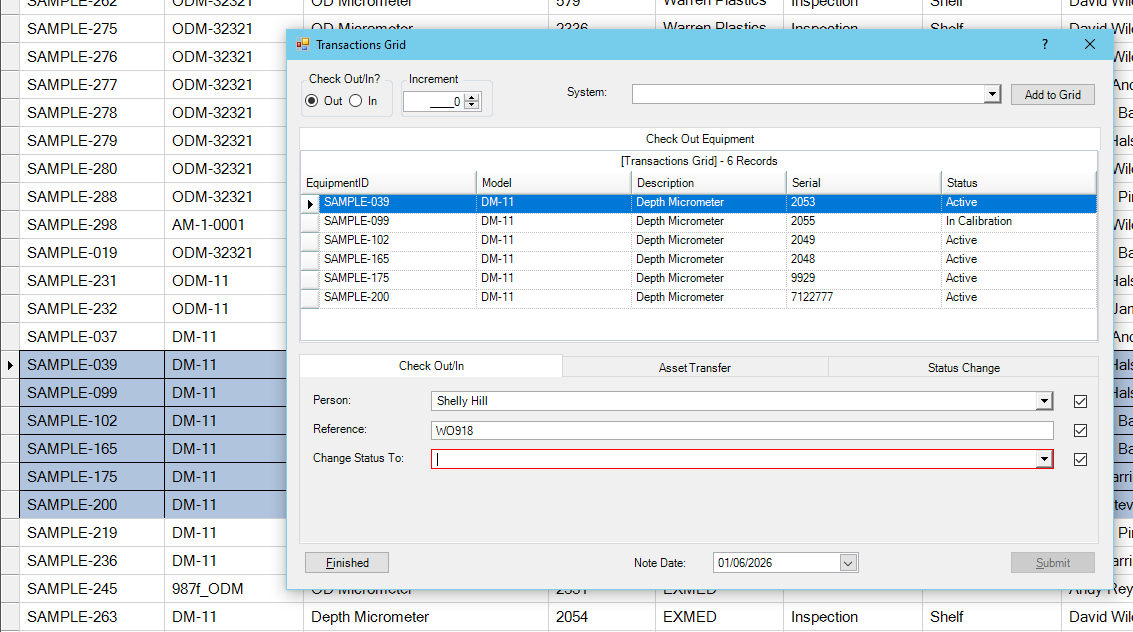
How to Check Out
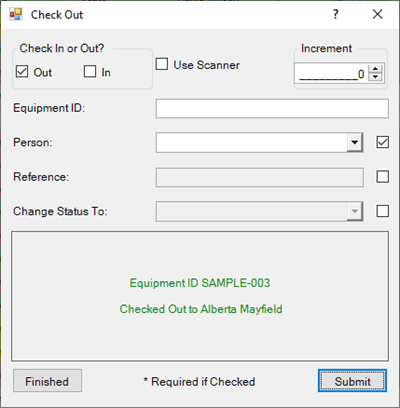
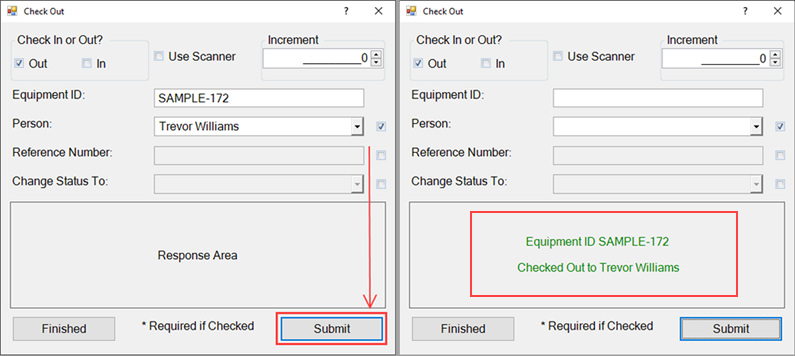
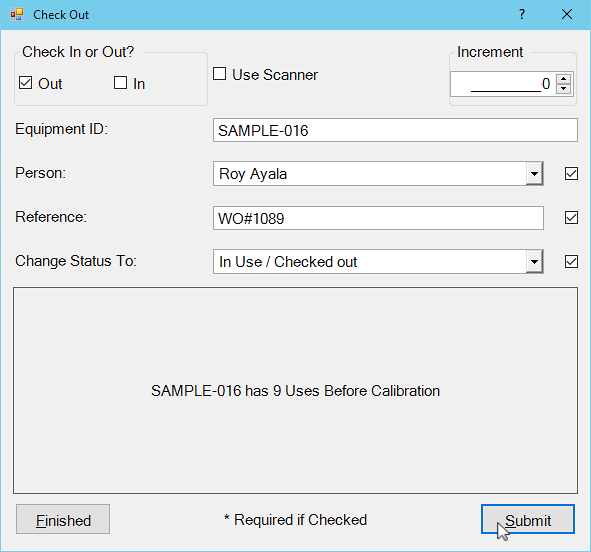
To check out equipment, select the Out checkbox and enter a valid Equipment ID as the minimum requirement, then hit the [Submit] button.
Enable additional fields by clicking the other checkboxes requiring input for a Person, Reference Number (e.g., Work Order), and/or a Status Change related to the current equipment. Confirmation of the Check Out appears in the Response Area of the dialog:
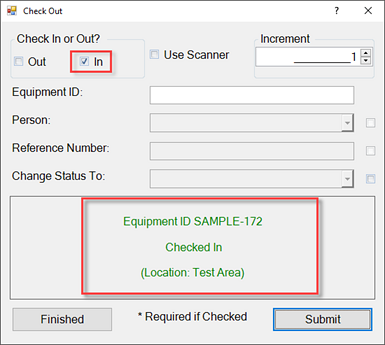
How to Check In
It is simple to perform the Check In of equipment to document the returned item. Simply open the Check Out feature dialog and checkmark the In checkbox, enter the Equipment ID if the field is blank, and click [Submit]. Confirmation of the Check In also appears in the Response Area of the dialog.
Check Out Systems: An An Equipment System name can also be entered in place of the Equipment ID field. Perform same steps to check in/out an Equipment System.
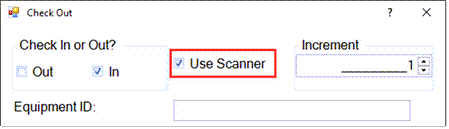
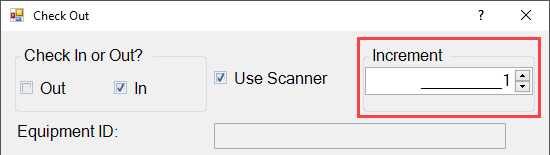
Check Out with Scanner
Using a Scanner: Enable the checkbox for "Use Scanner" to enable barcode scanning. Using a scanner for input disables manual entry of all fields. Use either a scanner or manually input all field values.
Scanning People Barcodes
Use Scanner for People Records: Create a simple report to print bar codes (or QR codes, if preferred) for corresponding data records. Watch a video for the sample barcodes report in effort to make scanning easier for the People checking an item out.
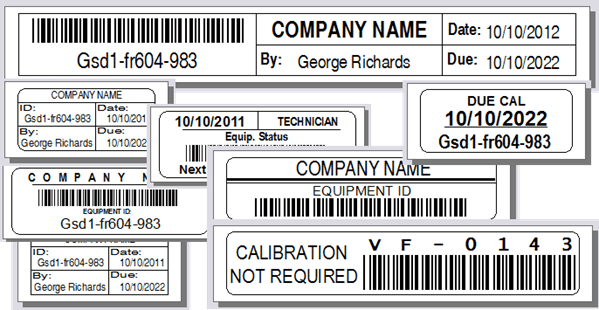
Formatting Calibration Control Barcodes
The default barcode used in Calibration Control is going to be the auto-generated equipment record Barcode ID. However, this can be overridden in barcode labels for Equipment or Systems using the following barcode format:
- Upper Case A-Z (Capital Letters)
- Integers 0-9 (Numbers)
- Special Characters: Plus (+), Minus/Dash (-), Period (.), Forward Slash (/), Space ( ).
- Note: Barcodes begin and end in alpha-numeric form surrounding the special characters.
Barcode Recognition Order
Sometimes scanning barcodes in Check Out can reveal data conflicts, so can be helpful to know the actual barcode recognition order in Calibration Control. When a barcode is scanned, Calibration Control performs database tests to determine what information (string) the barcode contains. The string is searched for in the following order:
- Is it an Equipment Barcode ID? (Default in Calibration Control)
- Is it an Equipment ID?
- Does the string appear in the Barcodes field of an Equipment record?
- Is it an Equipment System?
- Is it the ID of a Person? (if a Person entry is required)
- If none of the above, the string will be placed in the Work Order field.
Increments of Use in Check Out
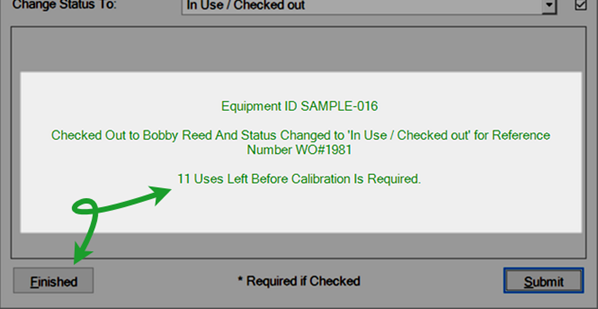
Some equipment or tools will require a calibration frequency based on a certain amount of wear or usage, as opposed to a calendar or timed interval (e.g., units of months or years, etc). This Calibration Frequency of Equipment Use Count, Use Days, or Use Hours can be managed with Check Out. Checking out Equipment with a Usage calibration frequency has auto-increment options. The Increment field in the Check Out dialog only affects equipment with the Use Count types of frequency, if the Next Calibration is not a date that has been overridden.
Default Increments in Check Out
- Increment Value: By default, the Use Count Increment during Check Out equals zero (0), and Check In equals one (1). The Response Area of the Check Out dialog displays the current count for the selected Equipment with a Use Count or Use Days Frequency prior to the Check Out submission.
- Manual Override: Increasing the Increment value shown in the Check Out dialog will override the default values and apply the increase to the current Use Count increment for that specific Equipment. This data change is displayed in the Edit Equipment dialog Misc tab for current Check Out status.
Equipment Use Count (+1 per Use)
The default Increment during Check Out is zero (0), increasing the Use Count by nothing. Equipment Use Count updates during Check In to increase by one (1), the default value. In other words, return the tool or check it out again (if applicable) to add one count of usage in the Equipment record.
Equipment Use Days (+1 per Day)
Check In increases the Use Count (Days) by one (1) Increment for each day the Equipment was checked out. The nature of this calibration frequency is time sensitive so tracking days of usage also occurs during Check Out and may update the Use Count (Days):
- If the tool is checked out multiple times (before Check In), then Calibration Control will apply its automated algorithm to count the number of days this tool has been out and used.
- If the previous Check Out occurred on another date, then the Use Count (Days) adds one (1) Increment for each day, just like Check In would.
- If the previous Check Out occurred on the same date, then there is nothing to change.
- Note that if Check In occurs on the same day as Check Out, by default, it counts as one day of use.
Check Out Increments Options: Change settings in Check Out Options to determine default use count increments upon check in/out.
Verify Check Out Status of Equipment
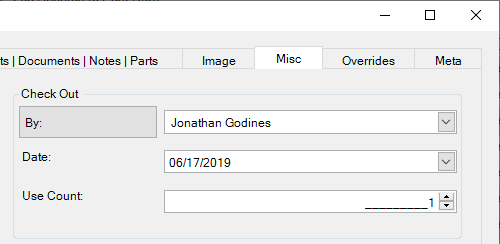
- Current Status: In the Equipment dialog, view the 'Misc' tab to verify current status of the Check Out Date and Checked Out By (Person) (if applicable). The Use Count integer is also visible, which resets to 0 after calibration.
- Override Count: You can override any value, if necessary, to input more current and accurate information.
- Equipment Job History Notes: The Check Out activity for a specific tool or equipment record is stored in the Notes panel grid of the Equipment dialog from the Grids tab. These notes are automatically created job tracking notes if the Check Out is performed using the transaction activity dialog. (Notes will not be automatically created if Check Out is manually recorded in an Equipment record from the Misc tab of the dialog.) Double-click on any note to view or edit.

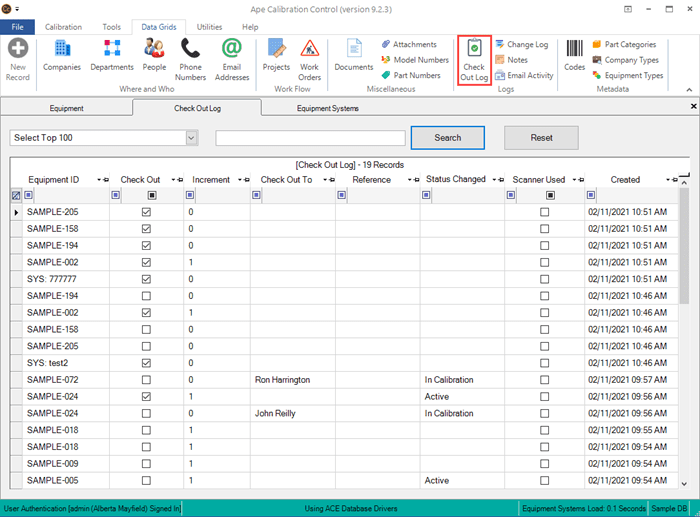
The Check Out Log (Job Tracking)
In version 9 and higher, the overall history of every Check In/Out of equipment used in jobs can be reviewed in the Check Out Log under Data Grids tab of the ribbon menu. By default, the Top 100 records display. Use the Select Top N Records dropdown to expand the range of displayed records. A helpful tool to find the job history, work order number, etc, is the built-in Search bar. Combine use of the search bar with the filter rows to track a specific job record or show only the data you want to find.
Check In/Out Dialog (Video)
The video below shows how to use the Check Out in the traditional dialog of Calibration Control. While the version demonstrated in the video is older and the software appearance may differ, the concept remains true for check-out of equipment and systems.
Multi-Transactional Dialog (Video)
Multiple equipment check-outs (including Systems) can be performed in a single transaction in Calibration Control (our Calibration Management Software) (~version 9.4 and higher). Watch the video to utilize the optional feature of a multi-transactional dialog tool. If the option is enabled, access this multi-transaction dialog by right-clicking on the selected record rows within the Equipment grid; choose from the context menu to Check Out, Asset Transfer, or enter a Status Change.